More advanced Time Lapse Photography
In an earlier post we discussed your first time lapse video and how to start with a small budget and equipment you’ve probably already got. Well now we’re going to delve a bit deeper. First off, let’s think about a few principles of time lapse that are important to take into account.
Making a smooth or blocky video
Some videos are very smooth and others are pretty blocky and the type you decide on it entirely down to your own preference. A smooth video may suit the filming of clouds or a sunset but a blocky video can sometimes look quite comedic. If you remember Benny Hill films from years ago they were very blocky and this was used to great effect. Put simply, if you want a smoother video you simply have a shorter interval between the shots taken by the camera and for blocky videos, have a longer interval.
Longer intervals also work well for time lapse videos of building being made as these can take months to complete and you don’t want the resulting video to take days to play. So, in short, the type subject of your video needs to be considered and then you can get on to the set-up.
Equipment
DSLR cameras are not expensive anymore and many people already have them but if you don’t, it’s worth getting one for the amount of control you’ll have over the resulting video. However, before you start you’ll also need some very important equipment, starting with a tripod. These are absolutely essential and it’s best to get a good one that is solid and can take the knocks. I’ve been through lots of tripods from cheap to expensive and I can say that I still use the expensive ones. Many cheap ones are in the metal recycling bin at my local amenities site. One note here, a Gorillapod is a fantastic investment as you can pop the camera in places you can’t put a normal tripod such as wrapped around scaffolding or a tree.
Secondly, you’ll need an intervalometer. A what!??
An intervalometers is a neat bit of kit that will control your camera for you. It’s essentially a remote control that 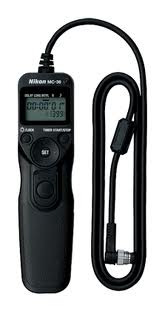 plugs into your camera and you don’t need to spend a lot, either. Check out eBay and Amazon and you’ll find some extremely reasonable prices for what is a very neat gadget. Watch out though, they generally work for a particular brand so you’ll need to check the make and model of your camera and buy the right one.
For my money, that’s the best and easiest option but you can also get software similar to the web cam package I mentioned in the previous article. Again, you’ll need to get the software that fits your particular camera and computer. The downside to this is you need to have your laptop connected to your camera at all times and while this may work in some situations, it can be a little cumbersome.
There’s one other item of equipment you should consider, too. Extra batteries. Most DSLR cameras have the option of an extra battery pack that can extend the life of the camera and for long shots, this has got to be considered. For really long shots you might need two so you can have one on charge at all times and then swap them out between shots.
Making the movie
OK, so you’ve got a card full of images, what next? Now you have to turn them into a movie, and this is the most exciting part!
Unfortunately, you’re probably going to have to spend some money here as the software used to create the finished sequence often comes with a price ticket, however for relatively small videos you can use LRTimelapse (http://lrtimelapse.com/shop/) for free for up to 400 images. If you’re a Mac user then you’ll also be able to do it with Quicktime Pro but there’s no free version here, it’ll cost you.
Another option if you’re willing to pay and want some other options such as panning, is Panolapse (http://www.panolapse360.com/). This allows you to do some extremely fancy effects to give your final video that extra-special touch!